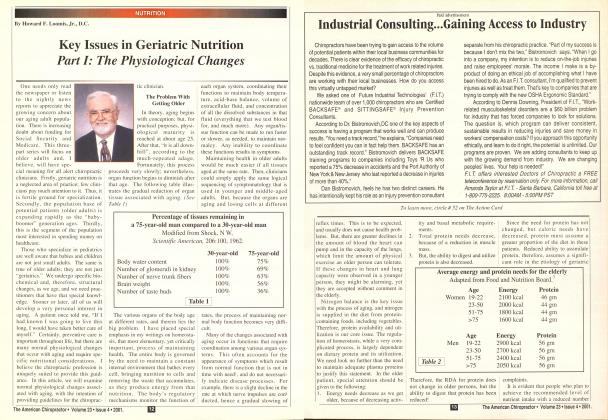
(A Three Part Series on the Philosophy, Science, and Art of Cranial Care) In Parts I and 2 of this series, I discussed the importance of cranial motion and its effects on health. From affecting the master endocrine glands (setting up major biochemical imbalances in the body), to the disturbance of the neurological impulse, cranial conditions can dramatically alter body function. As stated in part 1, causes of cranial conditions vary, but may be a result of: The birth process Injuries or traumas to the head, jaw. and lace Dental conditions Mental/emotional stress Nutritional deficiencies, and/or An\ spinal/sacroiliac subluxation In part two I discussed how to examine and treat the patient—first, through observation: and. secondly, through palpation. In this third and final segment. 1 will discuss how to examine and correct cranial faults using motion and cerebral spinal fluid fluctuation: how to examine and treat temporomandibular joint dysfunction: and the use of procedural codes when performing cranial technique. After going through the question/answer/observation survey discussed in Part 2. and after you have palpated all sutures and landmarks, you should then perform the cervical cranial sutural procedure outlined in Part 2. At this point you would, then, palpate the temporomandibular joint The Teniporomaiulilmlar Joint The temporomandibular joint is a diarthroidal joint that is a combined ginglvmus and gliding joint. This means that it is a ball and socket type joint, as is the shoulder. Therefore, as the jaw opens, the condyles of the mandible glide (translate) anterior. The joint is composed of the mandibular fossa of the temporal bone, and the articular tubercle and condyle of the mandible. It is a very powerful joint that can exert up to 600 lbs. of pressure per square inch, and is highly invested with a rich nerve supply and proprioceptive capability (as via the sensory homunculus of the cerebral cortex), which can differentiate the thickness of a hair between the teeth. When the temporomandibular joint misaligns, it creates tremendous force into the cranial sutures, jamming sutures such as the temporosphenoidal. squamosal. and oceipitomastoid. When examining this important joint, please follow the procedures below. Testing the TMJ Proper Observe the patient's facial fea tures, to see if the chin is moved or is pointing to the patient's left or right. Now. proceed with deep palpation at the root of the auricularis. and the temporal parietal muscles. First, cheek the masselers. espe cially at the origin, which is the lower margin of the zygomatic arch. Then, check at the insertion, which is the angle and ramus of the mandible. When testing the belly of the masscter. check it from the side or at its anterior border. Then, check the insertion oT Continued on Ptif>e 42 ..from I'axc 40 the temporalis into the anterior border and medial surface of the coronoid, as well as its origination from the temporal fossa and fascia. Since the TMJ has such a wide variety of and quantity of move ment, muscles can be dramatically affected or affect joint stability. Therefore, whenever you have this kind of situation, please challenge each muscle at the belly, origin : and insertion, when the muscle is : relaxed, as well as in contraction. You will usually find more pain in ; a muscle when that muscle is chal- i lenged (stretched), than when it i isn't. j Have the patient open and close I the jaw slowly (3-4 seconds to | open, as well as to close). | Observe whether there is any pop- | ping, clicking, jaw movement or j deviation toward one side, or in a | stair-step motion, or if the patient j is experiencing pain. I Have the patient move his jaw [ from side to side (left to right). | Sometimes the patient cannot do j this simple task, like moving his | jaw left or right. Either, he can j move right and not left, or he | moves further in one direction i than the other, signifying a prob- [ lem. | Now place your index finger tips j at the center of the ramus of the j mandible. Then, have the patient i open his mouth. Normal motion j of the jaw causes no pain, since I the condyle, upon opening, trans- j lates (glides) anterior. The normal ! feeling is to experience equal pies- j sure on each index finger (ramus | moving away). If this is not so, ! you will feel more pressure on one side and the patient will feel more pain in the jaw on the same side that is not translating anterior. Palpate the TMJ proper, in a closed as well as open position, at the anterior, posterior, inferior, and superior portions of the joint. Palpatory pain indicates a com pression or problem with that joint. Once you have identified that there is temporomandibulai" joint dysfunction, follow the procedures below: Procedure 1 Masseter Temporalis Technique (See Figure 2) Use either the muscle spindle technique or the golgi organ tendon reflex to relax the temporalis or masseter musculature or, for that matter, any muscle. Muscle Spindle Techniques Where you apply direct pressure to the belly of the muscle, causing inhibition/relaxation of the muscle spindle. The muscle spindle is a simple cord level reflex, which causes a contraction of the belly of the muscle when it is stretched suddenly and uncontrollably, as in a fall, accident or trauma. To break, this neurologic cord level reflex, you hold direct pressure over a painful point on the belly of this muscle, while the patient breaths slowly, and deeply, thus breaking this neurologic cord level reflex. This causes the belly of the muscle to relax. You can use thumbs, fingers, (tips and pads), holding deep pressure over the belly of the temporalis or masseter muscle for 5-8 respiratory cycles. Then repeat if necessary. Pain and muscle contraction should be reduced within 5-10 minutes after the application, if successful. It may— and usually does—take awhile (5-10 minutes) for the spasm and pain to decrease. Please note that this is a deep contact: so. make sure that your "angle of j contact" is right. The angle of contact is where you palpate muscle, tendon, ligament, or bone from different angles, which you must challenge from different directions. Palpating any point from the wrong direction may not elicit a response. If it does not palpate positive, then you missed the line of attack, and challenged it from the wrong line of drive, in this case making a palpatory error. These anatomical points are "three-dimensional structures", so our palpation, and challenge should also be "three-dimensional". Make sure that the patient is able to relax the area that you are contacting. Patients usually describe the feeling of the contact as "It hurts good". Origin-Insertion Techniques Where you apply pressure to the origin, and insertion of the muscle/tendoh which causes a relaxation of the golgi organ tendon reflex. This reflex is also a neurological cord level reflex that, when trac-tioned/pulled or stretched, tightens, and nodulates the tendon of a muscle at its origin or insertion. This contact inhibits the neurological cord reflex, and relaxes the tendon portion of the origin or insertion. Your contact points are at the origin, or insertion, or both, at the same time, applying deep pressure as the patient breathes deeply (6-8 seconds inhalation, 8-10 seconds exhalation) to the patient's absolute tolerance, and focus. I often communicate continuously with the patient, and learn what the patient's tolerance to pain is. But. using deep breathing techniques, and explaining, and coaching the patient to relax the painful area is a must. If this is not done, you may not have a happy camper on your side. Also, explain what you are doing. Nothing relaxes a patient faster then a doctor who knows what she or he is doing. Using the $100-words impresses the patient, even if they cannot totally grasp what you are saying. They know "you do", and that's all that matters, anyway. Procedure 2 Temporal Frontal Parietal Lift With the patient supine, make a bilateral contact with the temporal squama, using your 4th and 5th fingertips/pads. The middle finger contacts the sphenoid, the index contacts the frontal bone, and your thumbs do a cross contact (right thumb tip to the left parietal bone (slightly lateral to the sagittal suture, and vice versa for the left thumb). Now. lift all the contacts in a superior, and posterior or anterior direction, on inhalation or exhalation. Repeat, until you feel equal motion, and movement on both sides under all of your lingers. Note which area(s) feel restricted, and work more closely with those areas, using all the techniques explained above. This procedure is great for opening the sagittal suture, increasing the drainage of the sagittal sinus, and drainage of the CSF channels. Procedure 3 Occipital Sutural Spread and Occipital Pump With the patient's eyes closed, contact the eyeball through the eyelid.and palpate for tension and pain. Does one eye feel painful or tense? If so, perform the following simple procedure: Press on the eyeballs, according to tolerance, bilaterally, as the patient goes through 10-12 respiratory cycles. Repeat again, if necessary. This should reduce the pain, and tension. If it does not. then bring each temporal into internal and external rotation, by turning the patient's head to the right to correct the left temporal and vice versa. Example: For a left eye problem, turn the patient's head to the right and contact in front of the left mastoid tip. with the right thumb, as your left fingertips are on the squama. On inhalation, bring the temporal into external rotation, by pushing the mastoid tip posterior, as the temporal squama is moved anterior. Repeat opposite physiologic motion if the above didn't work. That would mean moving the temporal exactly opposite of what you just did. on inhalation and exhalation. Now. recheck the eyes. Pain should be gone. Now. contact the occipital mas toid suture with a four-finger con tact, tractioning your contact later ally, as the patient inhales and exhales for 5 cycles. Next, contact the occipital squama with your thenur pads, making sure that you are medial to the occipital mastoid suture. Hold a 5-6 pound contact, bending the occipital squama medially, as the patient goes through 3-5 respirato ry cycles. • This ends the sutural proce dure, which takes anywhere from 5-30 minutes, depending on the severity of the cranial faults. 1 realize that this is very difficult subject matter to visualize and perform from a three-part article, but I hope it has stimulated you to learn more about this very important technique. Oh. yes. the procedural code that I use when performing cranial therapy is 98943 fee S55. Please note that, when you perform a spinal manipulation on the same day, use the modifier -51 (example: 98943-51). Dr. James Ciimi has been teaching, and writing on this subject for 20 years. Dr. Ciina also teaches seminars and has created a software package for doctors, to help them assess their patients' needs. For more information, call toll free 1-877-627-2770 or fax 561-624-387/. or e-mail Dr. Ciina at [email protected].