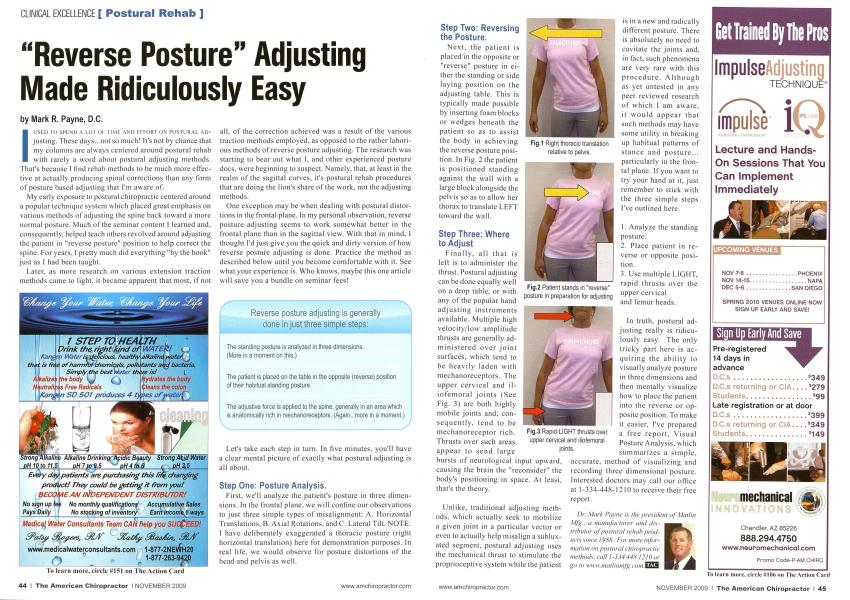
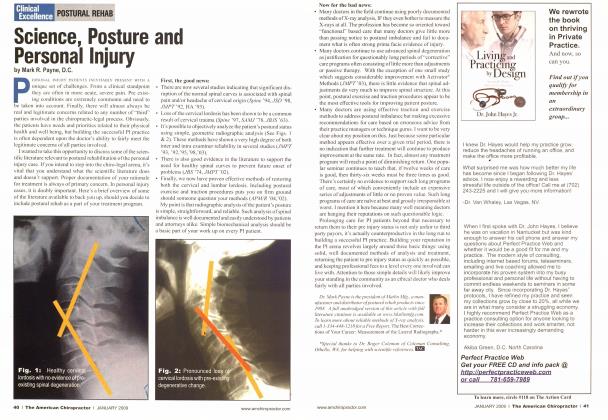
|usi-:n to si'i-nd a lot oi timi: and i.itort on postural ai>-justing. These days...not so much! It's not by chance that my columns are always centered around postural rehab with rarely a word about postural adjusting methods. That's because I find rehab methods to be much more effective at actually producing spinal corrections than any form of posture based adjusting that I'm aware of. My early exposure to postural chiropractic centered around a popular technique system which placed great emphasis on various methods of adjusting the spine back toward a more normal posture. Much of the seminar content I learned and. consequently, helped teach others revolved around adjusting the patient in "reverse posture" position to help correct the spine. For years. I pretty much did everything "by the book" just as I had been taught. Later, as more research on various extension traction methods came to light, it became apparent that most, if not all. of the correction achieved was a result of the various traction methods employed, as opposed to the rather laborious methods of reverse posture adjusting. The research was starting to bear out what I. and other experienced posture docs, were beginning to suspect. Namely, that, at least in the realm of the sagittal curves, it's postural rehab procedures that are doing the lion's share of the work, not the adjusting methods. One exception may be when dealing with postural distortions in the frontal plane. In my personal observation, reverse posture adjusting seems to work somewhat better in the frontal plane than in the sagittal view. With that in mind, I thought I'd just give you the quick and dirty version of how reverse posture adjusting is done. Practice the method as described below until you become comfortable with it. See what your experience is. Who knows, maybe this one article will save you a bundle on seminar fees! Let's take each step in turn. In five minutes, you'll have a clear mental picture of exactly what postural adjusting is all about. Step One: Posture Analysis. First, we'll analyze the patient's posture in three dimensions. In the frontal plane, we will confine our observations to just three simple types of misalignment: A. Horizontal Translations. B. Axial Rotations, and C. Lateral Tilt. NOTE: I have deliberately exaggerated a thoracic posture (right horizontal translation) here for demonstration purposes. In real life, we would observe for posture distortions of the head and pelvis as well. Reverse posture adjusting is generally done in just three simple steps: The standing posture is analyzed in three dimensions. (More in a moment on this.) The patient is placed on the table in the opposite (reverse) position of their habitual standing posture. The adjustive force is applied to the spine, generally in an area which is anatomically rich in mechanoreceptors. (Again...more in a moment.) Step Two: Reversing the Posture. Next, the patient is placed in the opposite or "reverse" posture in either the standing or side laying position on the adjusting table. This is typically made possible by inserting foam blocks or wedges beneath the patient so as to assist the body in achieving the reverse posture position. In Fig. 2 the patient is positioned standing against the wall with a large block alongside the pelvis so as to allow her thorax to translate LEFT toward the wall. Step Three: Where to Adjust Finally, all that is left is to administer the thrust. Postural adjusting can be done equally well on a drop table, or with any of the popular hand adjusting instruments available. Multiple high velocity/low amplitude thrusts are generally administered over joint surfaces, which tend to be heavily laden with mechanoreceptors. The upper cervical and il-iofemoral joints (See Fig. 3) are both highly mobile joints and, consequently, tend to be mechanoreceptor rich. Thrusts over such areas appear to send large bursts of neurological input upward, causing the brain the "reconsider" the body's positioning in space. At least, that's the theory. Unlike, traditional adjusting methods, which actually seek to mobilize a given joint in a particular vector or even to actually help misalign a sublux-ated segment, postural adjusting uses the mechanical thrust to stimulate the proprioceptive system while the patient is in a new and radically different posture. There is absolutely no need to cavitatc the joints and. in fact, such phenomena are very rare with this procedure. Although as yet untested in any peer reviewed research of which I am aware, it would appear that such methods may have some utility in breaking up habitual patterns of stance and posture... particularly in the frontal plane. If you want to try your hand at it. just remember to stick with the three simple steps I've outlined here. 1. Analyze the standing posture. 2. Place patient in reverse or opposite position. 3. Use multiple LIGHT, rapid thrusts over the upper cervical and femur heads. In truth, postural adjusting really is ridiculously easy. The only tricky part here is acquiring the ability to visually analyze posture in three dimensions and then mentally visualize how to place the patient into the reverse or opposite position. To make it easier, I've prepared a free report. Visual Posture Analysis, which summarizes a simple. accurate, method of visualizing and recording three dimensional posture. Interested doctors may call our office at 1 -334-448-1210 to receive their free report. Dr. Mark Payne is the president of Mall in Mjg-, a manufacturer and distributor of postural ivlhih products since 19tS<S. For more information on postural chiropractic methods, call 1-334 44,S 12II) or go to www:mallinmfg.com.t£S3 Fig.1 Right thoracic translation relative to pelvis. Fig.2 Patient stands in "reverse" posture in preparation for adjusting Fig.3 Rapid-LIGHT thrusts over upper cervical and iliofemoral joints.