It’s Not What You Do But How You Do It
YOGA
Part 2 Lower Body
Tarra J. Madore
DC, E-RYT 500
It is amazing how many people come to yoga with lower back pain. Often, the yoga studio is the last resort. People have exhausted all avenues and feel as if they will live with back pain forever. Luckily, we have an excellent referral network. For those who haven’t tried chiropractic, we refer them immediately, and our style of yoga supports the DC’s work. Sadly, chiropractors don’t know much about the different types of yoga. I’m hoping to change that with these articles. Not many yoga teachers have the skills and knowledge to deal with lower back pain. Smart Asana Yoga-trained teachers are ready to help and support your patients.
Some poses are common and performed many times in Hatha yoga classes. The problem is if they are not performed well, students in class run the risk of injury. One staple pose is Adho Mukha Svanasana (downward facing dog). Because so many people think yoga is just about flexibility (which is not true), they do this pose to feel the stretch, usually in the shoulders and hamstrings. When they do this, they miss all the benefits of the pose. They force a stretch instead of working on both strength and flexibility with good aligmnent.
The directions:
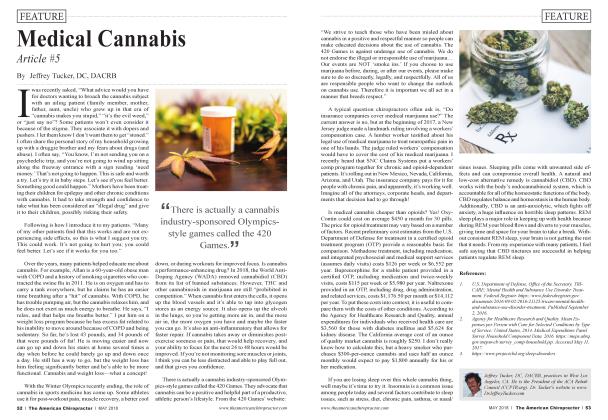
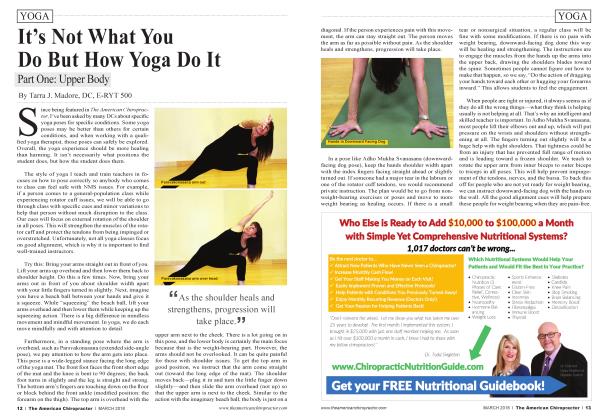
From tabletop position (hands and knees), place the hands shoulder width apart with index fingers facing forward and the arm bones lifted (as stated in Part 1). Shoulders are behind the wrists, and the hips are over the knees. Our focus is to lengthen and protect the lower back, strengthen the abdominal muscles, and lengthen the hamstrings and muscles of the calves. Keeping the feet facing forward will prevent the SI joints from jamming and the piriformis muscles from overgripping. The tabletop position promotes the natural lumbar curve. We know if there is a hyperlordosis, many lower back conditions could be exacerbated. We are careful to promote the natural curve by pressing the thighs back, lengthening the tailbone, and moving it slightly forward, which will engage the lower abdominal muscles. From here, we lift the knees about six inches off the mat, keeping the angle in the arms. The action is to drag the feet toward each other keeping the knees as wide as the ankles. This will activate the inner thighs (Photo A). From that position, the legs press straight back keeping the curve of the lumbar spine (Photo B). The key is that the lower back position does not change, even if you have to keep a slight bend in the knees. When people have tight hamstrings, the pelvis usually tucks under, which causes the lower back to round. This causes a cascade of
the risk of injury in the pose. However, Adho Mukha Svanasana can be incredibly beneficial for people because the forward fold is not as deep as some other poses. It is a gradual pose to increase the flexibility of the back of the body, which will increase range of motion.
Going deeper into forward-folds is challenging for lower back issues. The alignment is so important. Most people think you have to reach your hands down to the floor and to accomplish that, they round the lower back. This flexion puts undue stress on the lumbar spine. In classes where teachers do not pay attention to aligmnent or where props are not readily available, this can be devastating for disk injuries. From a standing position, weight is balanced in the feet from front to back and side to side. We instruct the student to hinge at the hip joints—not at the waist. The back position never changes from standing through to the folded position. In fact, nothing changes from the hips to the floor and the hips to the crown of the head—the student just hinges at the hips to lengthen the back of the body. The lumbar region stays in natural
lordosis to protect the spine (Photo C).
When the student isn’t able to reach the floor, we use props. Many people come to yoga with tight muscles. Yoga helps increase flexibility from wherever you are. You do not have to be flexible to start yoga, but you do want to find the appropriate class to support and nurture your journey. In our class, props are readily available. If the floor is out of reach, raise it up. Two blocks are used about shoulder width apart and the fingers are placed on the blocks (Photo D). The blocks can then be used in a flow of poses—from forward-fold, the blocks could be placed next to the feet and the student would step one leg back coming into a lunge pose. We can explore this in a later issue. Many styles of yoga do a flowing sequence of poses, which if not performed well, may lead to problems.
The last pose I want to discuss is a backbend. In addressing lumbar issues, it is important to look at strengthening the lower back muscles and encouraging the natural curve of the lumbar spine. Most chiropractors and physical therapists are familiar with the McKenzie exercises. These exercises resemble yoga poses but are performed with less attention to detail. While the goal is to strengthen the lower back, encourage the natural curve, and reduce pain, I have found that, quite often, just the opposite happens. In McKenzie exercises, the client is prone on the floor and props up on the elbows or pushes up into what looks similar to Bhujangasana, or cobra pose (Photo E). In Bhujangasana, we pay attention to all the parts of the body.
While lying prone, the student is instructed to lengthen back through the feet. To press down into the floor through the feet, which allows the thighs to press up toward the ceiling, creating the lumbar curve. To make sure the student doesn’t compress the lumbar spine, he or she is instructed to lengthen the tailbone toward his or her feet and toward the floor, which will lengthen the spine and engage the lower abdominal muscles.
This makes a huge difference in our pose versus the McKenzie exercise. While lying prone, the student is instructed to lengthen back through the feet. To press down into the floor through the feet, which allows the thighs to press up toward the ceiling, creating the lumbar curve. To make sure the student doesn’t compress the lumbar spine, he or she is instructed to lengthen the tailbone toward his or her feet and toward the floor, which will lengthen the spine and engage the lower abdominal muscles. This makes a huge difference in our pose versus the McKenzie exercise. In the upper body, the student’s hands are placed next to the chest, fingers just behind the shoulders. The side of the body is lengthened by sliding the shoulders toward the ears and up toward the ceiling. Before the student lifts, he or she presses into the hands and does the action of dragging the
hands back toward the feet, which inches the chest forward and keeps the spine long with space between each vertebra. With the hands under or behind the shoulders, the lower back does not get the compressive force as it does with the hands forward of the shoulders as in McKenzie’s exercises. I have helped countless people who have felt worse after rounds of physical therapy just by paying attention to how they are performing exercises. With all of our backbends focusing on proper aligmnent, people feel much stronger quickly.
For Chiropractors, knowing what styles of yoga to recommend and warn against is important. There are far too many yoga practices that do not focus on alignment. In fact, there are styles that think alignment doesn’t matter and that you should just do what feels good. In my opinion, that is risking and potentially harmful to the student. You don’t always feel good or bad immediately. Following basic anatomical and biomechanical principles is far more effective and supports the great work done by DCs.
References:
1. Calais-Germain, Blandine (English Edition 1993, 2007) Anatomy of Movement. Eastland Press, Inc., Seattle, Washington.
2. Drei singer, PhD, Thomas E. "McKenzie Therapy for Mechanical Low Back Pain." Spine-Health. N.p., 8 Mar 2007. Google
. Web. 1 Mar. 2013. http://www.spine-health.com/wellness/ exercise mckenzie therapy-mechanical-low-back-pain>.
3. Jarmey, Chris (2003, second edition 2008). The Concise Book of Muscles. Lotus Publishing and North A tlantic Books, Berkeley, California.
4. McKenzie, R., &May, S. (2003). The lumbar spine mechanical diagnosis and therapy. (2nd ed., Vol. One). Waikanae: Spinal Publications New Zealand
5. Photo Credit: Rick Brightly
Tarra J. Madore, DC, E-RYT 500, is on a unique mission to inform and educate people about yoga and how it can complement chiropractic care. She simultaneously practiced yoga while also attending Palmer College of Chiropractic in Davenport, Iowa. She practiced chiropractic for 10 years before “retiring ” due to a repetitive stress injury to her wrist. She turned her injury into opportunity by uniting her two vocations in 2004 when she opened her yoga studio, Smart Asana Yoga, in her hometown of North Brunswick, New Jersey. Recently, Tarra opened another studio in the Princeton, New Jersey area. She now trains yoga instructors at the 200and 500-hour levels, and she is certifying instructors in Smart Asana Yoga (SAY). She also has created a Basic Yoga Therapy Certification for those instr uctors who want to know more about the human body, how it works, how to prevent injury, and how to heal. She can be reached at 732-951-1100 or by visiting www. smartasanayoga. com.