The Essential Occipital/Atlas/Axis Balance
TECHNIQUE
William H. Koch
D.C.
The occiput is the pinnacle of full spine alignment and balance.
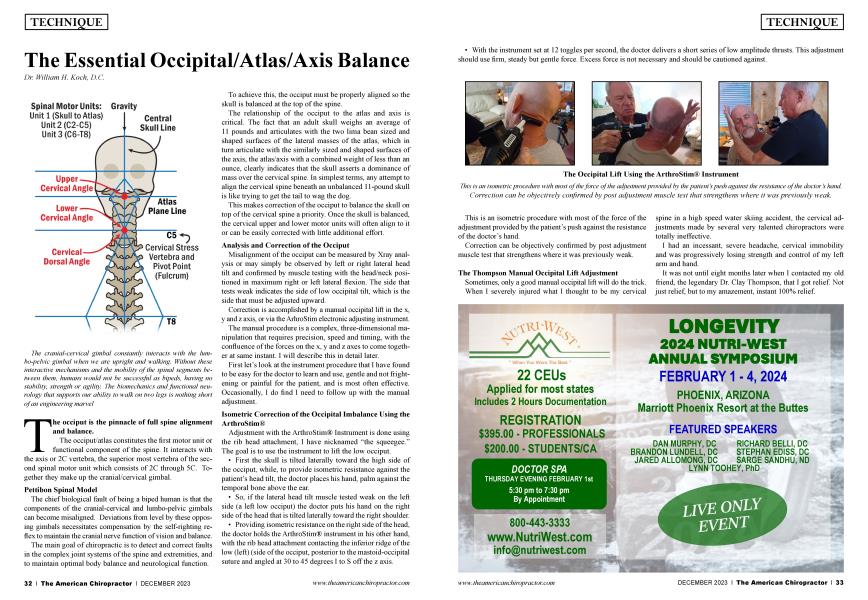
The occiput/atlas constitutes the first motor unit or functional component of the spine. It interacts with the axis or 2C vertebra, the superior most vertebra of the second spinal motor unit which consists of 2C through 5C. Together they make up the cranial/cervical gimbal.
Pettibon Spinal Model
The chief biological fault of being a biped human is that the components of the cranial-cervical and lumbo-pelvic gimbals can become misaligned. Deviations from level by these opposing gimbals necessitates compensation by the self-righting reflex to maintain the cranial nerve function of vision and balance.
The main goal of chiropractic is to detect and correct faults in the complex joint systems of the spine and extremities, and to maintain optimal body balance and neurological function.
To achieve this, the occiput must be properly aligned so the skull is balanced at the top of the spine.
The relationship of the occiput to the atlas and axis is critical. The fact that an adult skull weighs an average of 11 pounds and articulates with the two lima bean sized and shaped surfaces of the lateral masses of the atlas, which in turn articulate with the similarly sized and shaped surfaces of the axis, the atlas/axis with a combined weight of less than an ounce, clearly indicates that the skull asserts a dominance of mass over the cervical spine. In simplest terms, any attempt to align the cervical spine beneath an unbalanced 11-pound skull is like trying to get the tail to wag the dog.
This makes correction of the occiput to balance the skull on top of the cervical spine a priority. Once the skull is balanced, the cervical upper and lower motor units will often align to it or can be easily corrected with little additional effort.
Analysis and Correction of the Occiput
Misaligmnent of the occiput can be measured by Xray analysis or may simply be observed by left or right lateral head tilt and confirmed by muscle testing with the head/neck positioned in maximum right or left lateral flexion. The side that tests weak indicates the side of low occipital tilt, which is the side that must be adjusted upward.
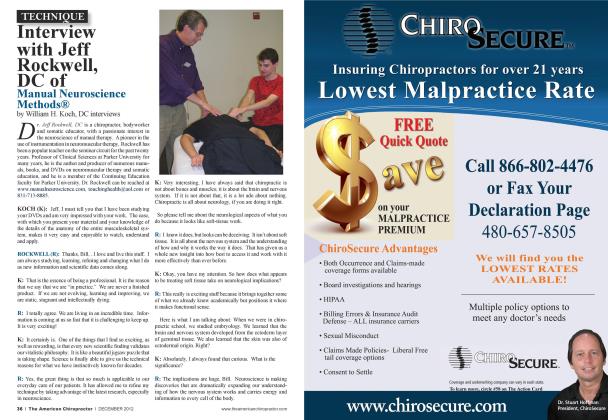
Correction is accomplished by a manual occipital lift in the x, y and z axis, or via the ArhroStim electronic adjusting instmment.
The manual procedure is a complex, three-dimensional manipulation that requires precision, speed and timing, with the confluence of the forces on the x, y and z axes to come together at same instant. I will describe this in detail later.
First let’s look at the instrument procedure that I have found to be easy for the doctor to learn and use, gentle and not frightening or painful for the patient, and is most often effective. Occasionally, I do find I need to follow up with the manual adjustment.
Isometric Correction of the Occipital Imbalance Using the ArthroStim®
Adjustment with the ArthroStim® Instrument is done using the rib head attachment, I have nicknamed “the squeegee.” The goal is to use the instrument to lift the low occiput.
• First the skull is tilted laterally toward the high side of the occiput, while, to provide isometric resistance against the patient’s head tilt, the doctor places his hand, palm against the temporal bone above the ear.
• So, if the lateral head tilt muscle tested weak on the left side (a left low occiput) the doctor puts his hand on the right side of the head that is tilted laterally toward the right shoulder.
• Providing isometric resistance on the right side of the head, the doctor holds the ArthroStim® instrument in his other hand, with the rib head attachment contacting the inferior ridge of the low (left) (side of the occiput, posterior to the mastoid-occipital suture and angled at 30 to 45 degrees I to S off the z axis.
• With the instrument set at 12 toggles per second, the doctor delivers a short series of low amplitude thrusts. This adjustment should use firm, steady but gentle force. Excess force is not necessaiy and should be cautioned against.
This is an isometric procedure with most of the force of the adjustment provided by the patient’s push against the resistance of the doctor’s hand.
Correction can be objectively conhrmed by post adjustment muscle test that strengthens where it was previously weak.
The Thompson Manual Occipital Lift Adjustment
Sometimes, only a good manual occipital lift will do the trick. When I severely injured what I thought to be my cervical
spine in a high speed water skiing accident, the cervical adjustments made by several very talented chiropractors were totally ineffective.
I had an incessant, severe headache, cervical immobility and was progressively losing strength and control of my left arm and hand.
It was not until eight months later when I contacted my old friend, the legendary Dr. Clay Thompson, that I got relief. Not just relief, but to my amazement, instant 100% relief.
Dr. Thompson quickly determined that the force of hitting the water at high speed literally knocked my head out of its balanced position on top of my cervical spine. He said to me, “Don’t worry, I’ll take care of it.”
The intensity and sound of this adjustment so startled me that I exclaimed, “Clay, what the hell did you just do?” He answered, “Shut up. I just put your head on straight.”
He further explained that when the occiput is out of balance, it can rob you of bilateral cerebral integration, meaning that you can become excessively either “right or left brained,” altering the personality. This adjustment truly restores balance.
Below I describe in detail, step by step, the life changing adjustment he performed on me. In my opinion it is the most technique intensive and important of all adjustments. It is well worth mastering.
• The doctor stands to the side of the seated patient opposite the side of inferior tilt and hand contact.
• The patient’s head is supported firmly against the doctor’s sternum.
• When adjusting a left occiput, standing on the right side of the patient, the doctor reaches around the back of the patient’s head and with the pisiform of his left hand contacts the occipital ridge posterior to the occipital-mastoid suture.
• The doctor’s hand must be cupped, and care must be taken not to contact the patient’s ear or mandible.
• With his right hand, the doctor then reaches around the front of the patient’s head, cupping it over his left, or contact hand for stability.
• For a left occiput, the patient’s head is rotated slightly to the right, towards the doctor. The rotation should be minimal. This adjustment should NOT become a rotaiy break.
• The doctor’s elbows must be extended outward to avoid any contact with the patient’s head other than the pisiform of the contact hand on the occiput.
• The elbow on the contact side is dropped or lowered, while that of the supporting hand is slightly raised.
• Once the doctor’s upper body is properly positioned, and firm contact with the occiput is secure, the doctor must bend at the waist and knees to set up for a full body thrust.
• The final component of the three-dimensional thrust, which must be precisely timed and coordinated with the lift and slight rotation, is “the scoop.”
• The scoop is accomplished by a drop of the doctor’s elbow on the contact side while the forearm and contact hand roll or rotate inward and upward against the occiput in a rapid “scoop” and lift motion, while the doctor’s body rises from bent forward and at the knees into full extension.
• The lift, slight rotation and the scoop must come together in one smooth, very quick motion. Otherwise, it will not be effective.
• The adjusting thrust involves not only the doctor’s arms and shoulders, but also full extension of his spine and lower extremities.
• The patient’s head should not be allowed to slide on the doctor’s chest but should move superiorly with the doctor’s body. (If the patient’s head slides, it will dissipate the force of the lift.)
I cannot overstate how important I believe this adjustment is. For me, it was a life changing experience, without which I might not be here today. When Dr. Thompson did this adjustment, he released pressure on my brain stem as well as above and below the foramen magnum. It not only relieved my headache and restored function to my left arm, but re-booted my prefrontal cortex, restoring my emotional balance and clarity of thought.
When Dr. Thompson taught me this technique, he said to me, “Bill, go home and perfect this adjustment for yourself. You will find that there are thousands of patients who need it. It will accomplish what nothing else can duplicate.”
I have seen countless cases confirming Dr. Thompson’s words to be true. So, doctors: Practice, practice, practice!
Koch Method for the Analysis and Correction of the Axis or 2C
When the occiput is the major subluxation, rotations of 2C will usually align with it. However, when the axis is severely fixated or when it is the major cervical subluxation, with or without occipital imbalance, it must be individually corrected.
Below is a detailed description of my best methods for correction of 2C and the lower cervical motor unit, 2C through 5C.
Analysis of the Cervical Spine
During my first 30 years of practice, I considered x-ray to be the gold standard for spinal analysis. I still know it to be a valuable tool when done with proper equipment and precision, as in Pettibon True Plane Spinography, Grostic, CBP and Atlas Orthogonality. In recent years, however, I have come to realize the benefits of functional, real time information provided by muscle testing, as a viable and, I think, superior alternative for detecting the complex joint dysfunctions of the spine and extremities. Muscle testing provides immediate pre and post evaluation of the areas of the spine and extremities being targeted for correction.
X-ray analysis is static unless digital motion x-ray (DMX) is used. Muscle testing is dynamic, functional testing which can be used to monitor the effects of correction throughout the process. On a day to day basis, I now prefer to use functional muscle testing.
Functional Muscle Testing Analysis for 2C / Axis Rotation
The patient is seated facing the doctor.
• With arms extended fully forward
• They are instructed to rotate the head and neck fully to the right to the limits of their range of motion.
• The doctor instructs them to resist his challenge as he presses down on their arms in an S to I muscle test.
• This process is then repeated with the head rotated to the left.
• Weakness of right rotation indicates spinous rotation to the left.
• Weakness of left rotation indicates spinous rotation to the right.
• No weakness in either direction indicates no spinous rotation.
The ArthroStim® Correction: A Dynamic, Isotonic Instrument Adjustment of 2C
The procedure I most often use to correct a malposition of the axis or 2C using the ArthroStim® instrument is one I designate as 2C PRS or PLS Iso, where Iso stands for Isotonic.
In a typical Gonstead Listing we designate the malposition of a vertebra as P or A (posterior or anterior) R or L (right or left) S or I (superior or inferior). Or in the Carthaginian System used by some technique methods, you would designate using the X, Y and Z axes.
2C PRS is a chiropractic listing where 2C is subluxated Posterior Right Superior. 2CPLS designates a subluxation that is Posterior Left Superior.
However, the cervical vertebrae below 2C are usually rotated in the same direction. The axis or 2C provides a point of contact and leverage against which to apply our force in order to reduce the misalignment of the lower cervical motor unit which includes 2C through 5C.
I use a procedure which I designate as 2C PRS or PLS ISO. 2C refers to the vertebrae and PRS or PLS indicates the direction it has rotated. ISO or isotonic refers to a constant resistance we are moving the bone against. An isotonic movement is one that puts a consistent tension on the muscles while moving through a full range of motion.
In this dynamic, isotonic procedure we are not moving 2C singularly. Again, it is a leverage point we are using to move the entire lower cervical motor unit which is from 2C through 5C. The dynamic adjustment achieves this more effectively than a static adjustment. In this case, the angulations of the individual facets are irrelevant.
• Patient is seated with head in neutral position.
• If the muscle test is weak to the left and spinouses are rotated right, the doctor will have the patient turn their head to the right while he provides resistance with his fingers.
• So, first the doctor firmly but gently places his hand across the patient’s forehead, fingers directed toward the side to which the patient turns his head (in this case right).
• The doctor uses his fingers to provide resistance as the patient slowly and steadily turns his head toward the right.
• While the patient is slowly rotating his head and neck against the resistance provided by the doctor, the doctor’s other hand uses the ArthroStim® instrument, fitted with the single ball attachment and set to 12 toggles per second, to tap on the axis lamina-pedicle junction gently but firmly, on the side to which the atlas is rotated. In this case rotated right.
• The line of drive of the instrument should be between 45 and 60 degrees, right to left, P to A and slightly I to S.
• Reverse procedure for Left Cervical Rotation.
The doctor may have to repeat this procedure two to three times. In most cases, after a few repetitions, the patient will notice an improvement in the rotary freedom of motion. Correction is almost invariably confirmed by a dramatic improvement in the muscle test.
In this isotonic procedure, the patient’s muscles work against the doctor’s pressure to overcome resistance, thus pulling the axis into position. The action of the ArthroStim® instrument does not force the vertebrae into place but overcomes the friction-lock holding it in its subluxated position.
The Advantage of Isometric and Isotonic Adjustments
The Adjustment of the Occiput is an isometric procedure. The adjustment of the 2C is an isotonic procedure. The use of isotonic and isometric resistance in our adjustments allows us to use the patient’s own muscles to facilitate the corrections. There are many advantages to the use of these procedures.
When the patient is an active participant and is in control of the action of the muscles, they do not feel they are surrendering control of their body. The thrusts the doctor applies with the ArthroStim® are light and non-threatening, with no cracking noises, invoking no fear or defensive reactions on the part of the patient. Adjustments done in this way are welcomed as opposed to being rejected by the internal mechanisms of the body. This makes “holding adjustments” much less of a factor in case management.
Analysis and Correction of the Atlas
It is important that we ultimately align the occiput, atlas and axis to assure normal function of the cervical/cranial gimbal.
In many cases, the atlas will realign as a result of the cervical decompression that occurs with an occipital lift adjustment. Alternatively, because the Atlas frequently subluxates laterally and rotates with the axis, it often will re-align when the axis is corrected.
If, however, after doing an occipital and an axis adjustment, the atlas is still misaligned, then it must be specifically adjusted, either manually or using the ArthroStim® instrument.
This can be a very tricky manual adjustment. However, I have found the ArthroStim® to be an easy and effective tool in repositioning the Atlas.
To determine the direction of subluxation, I suggest you utilize palpation and therapy localization muscle testing. Once the proper listing is determined, ASRA, ASRP, ASLA or ASLP, the doctor will proceed to set up for the correction.
• To correct a Right Atlas, either ASRA or ASRP:
• The doctor should determine how he can make his most precise contact with the instmment tip positioned on either the Atlas transverse process or the posterior arch.
• He then selects the best tip or sleeve to use on the instmment. I use either the bare rubber tipped shaft of the ArthroStim® Adjuster, which is very small, or the small sin-
gle tipped adjusting sleeve, which is a bit larger, depending upon how much space is available to make a good contact.
• The line of drive of the instmment should be slightly S to I (about 10 degrees) and either A to P (ASRA) or P to A (ASRP) depending upon the determination of rotation.
• If m doubt about rotation, it is best to just position the instmment and make a straight lateral adjustment on the transverse process, in this case R to L or ASR.
• I then set the instmment to 12 thrusts per second and use a light to moderate amount of pressure to direct motion of the Atlas.
“To determine the direction of subluxation, I suggest you utilize palpation and therapy localization muscle testing.”
Final Note
No matter how well the occiput and cervicals are adjusted, if the pelvis is not first balanced and the thoracic spine mobilized, the collections will not hold. That is why I always start by balancing the pelvis. [See my article The Pelvic Imperative.] I work from the bottom up, always adjusting the cervicals last.
Dr. Koch is a 1967 Cum Laude graduate of Palmer College of Chiropractic. He practiced in the Hamptons of Eastern Long Island, New York for 30 years and in the Bahamas for 15 years. Now, wanting to give back to the profession he offers courses on “The Koch Protocols for Integrated, Advanced, Chiropractic Techniques.” Simple, Effective, No Nonsense and Hands On. He may be reached on DrWilliamHKoch. com or by email outislanddc@drwilliamhkoch. com. Check out this free instructional video on Dr. Koch's instrument occiput procedure featured in this article at instantchiro.com/dr-william-integrated-advance-technique/