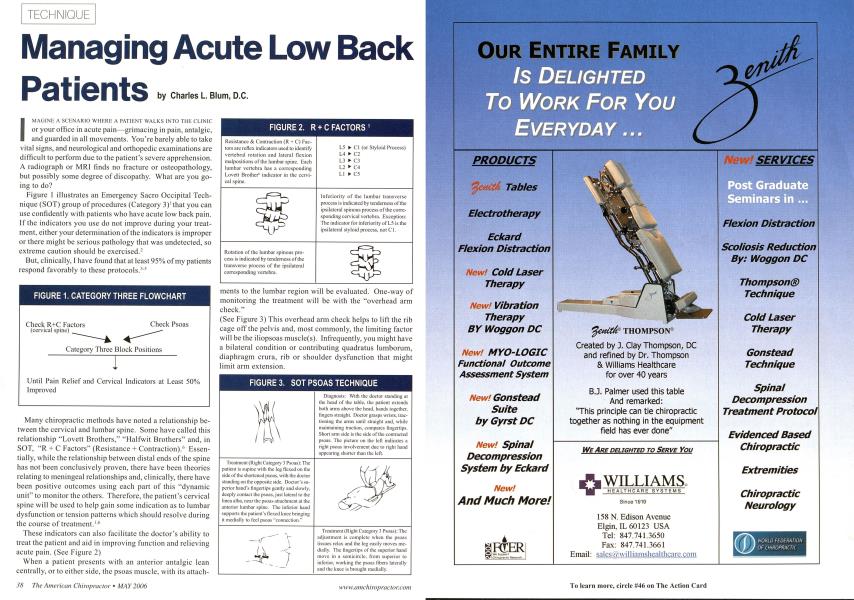
Patients I MAGINE A SCENARIO WIII.RR A PATIENT WALKS INTO Till: CLINIC or your office in acute pain—grimacing in pain, antalgic, and guarded in all movements. You're barely able to take vital signs, and neurological and orthopedic examinations are difficult to perform due to the patient's severe apprehension. A radiograph or MRI finds no fracture or osteopathology, but possibly some degree of discopathy. What are you going to do? Figure 1 illustrates an Emergency Sacro Occipital Technique (SOT) group of procedures (Category 3)' that you can use confidently with patients who have acute low back pain. If the indicators you use do not improve during your treatment, either your determination of the indicators is improper or there might be serious pathology that was undetected, so extreme caution should be exercised.2 But, clinically, I have found that at least 95% of my patients respond favorably to these protocols.'5 Many chiropractic methods have noted a relationship between the cervical and lumbar spine. Some have called this relationship "Lovett Brothers," "Halfwit Brothers" and, in SOT, "R + C Factors" (Resistance + Contraction).'' Essentially, while the relationship between distal ends of the spine has not been conclusively proven, there have been theories relating to meningeal relationships and, clinically, there have been positive outcomes using each part of this "dynamic unit" to monitor the others. Therefore, the patient's cervical spine will be used to help gain some indication as to lumbar dysfunction or tension patterns which should resolve during the course of treatment.1'' These indicators can also facilitate the doctor's ability to treat the patient and aid in improving function and relieving acute pain. (Sec Figure 2) When a patient presents with an anterior antalgic lean centrally, or to either side, the psoas muscle, with its attach- merits to the lumbar region will be evaluated. One-way of monitoring the treatment will be with the "overhead arm check." (See Figure 3) This overhead arm check helps to lift the rib cage off the pelvis and, most commonly, the limiting factor will be the iliopsoas musclc(s). Infrequently, you might have a bilateral condition or contributing quadratus lumborum, diaphragm crura, rib or shoulder dysfunction that might limit arm extension. FIGURE 2. R + C FACTORS Resistance & Contraction (R + C") Factors are reflex indicators used to identify vertebral rotation and lateral flexion malpositions of the lumbar spine. Laeh lumbar vertebra has a corresponding Lovett Brother1" indicator in the cervical spine. Rotation of the lumbar spinous process is indicated by tenderness of the transverse process of the ipsilateral corresponding vertebra. L5 ► Cl (or Styloid Process) L4 ► C2 L3 ► C3 L2 ► C4 LI ► C5 Inferiority of the lumbar transverse process is indicated by tenderness of the ipsilateral spinous process of the corresponding cervical vertebra. Exception: The indicator for inferiority of L5 is the ipsilateral styloid process, not Cl. FIGURE 3. SOT PSOAS TECHNIQUE Treatment (Right Category 3 Psoas): The patient is supine with the leg flexed on the side of the shortened psoas, with the doctor standing on the opposite side. Doctor's superior hand's fingertips gently and slowly, deeply contact the psoas. just lateral to the linea alba, near the psoas attachment at the anterior lumbar spine. The interior hand supports the patient's flexed knee bringing it medially to feel psoas "connection." Diagnosis: With the doctor standing at the head of the table, the patient extends both anus above the head, hands together, lingers straight. Doctor grasps wrists, trac-tioning the arms until straight and. while maintaining traction, compares fingertips. Short arm side is the side of the contracted psoas. The picture on the left indicates a right psoas involvement clue to right hand appearing shorter than the left. Treatment (Right Category 3 Psoas): The adjustment is complete when ihe psoas tissues relax and the ieg easily moves medially. The fingertips of the superior hand move in a semicircle, from superior to inferior, working the psoas fibers laterally and the knee is brought medially. Sometimes the patient will have so much pain, he or she can't be supine on the treatment table to allow for the technique of releasing the psoas. If that is the case, the psoas release will need to be performed on the next office visit or when the patient is able to tolerate being in a prone position. After cervical indicators are determined (if present) and psoas contracture cleared (if present), the patient is to be placed prone and leg lengths should be determined. SOT protocol recommends 30 seconds of traction on the legs with the traction maintained while the medial malleoli are brought together and evaluated. The blocks arc then used biomcchanically to help reduce pelvic torsion7 in a specific manner to release any stress patterns in the disc or lum-bosacral region.*•* Usually, the blocks are placed according to what reduces any pain provocation.10 Once the optimum pain relief position is determined by block position, the patient is allowed to relax. During this relaxation period, which can be 15-60 minutes, the cervical indicators are monitored. If they are no longer painful or swollen, allow the patient to rest. If cervical indicators are still painful and swollen, apply gentle pressure to the specific related lumbar vertebra in the direction opposite to the what was determined by the cervical indicator. For example, an inferiority would be lifted gently superiorly, while a rotation to the right would be gently rotated to the left. Sometimes, force will need to be vectored to the position that creates the greatest cervical indicator pain relief. FIGURE 4. CATEGORY 3 LEG LENGTH AND BLOCK PLACEMENT1 Category 3 Leg Length Assessment: With the patient prone and gripping the head of the table, the doctor applies traction to Ihe patient's ankles, thumbs just distal to the medial malleolus. Traction is applied for 30 seconds to relax hamstrings as patient pulls on the head of the table. After 30 seconds, the patient relaxes while the doctor maintains traction and brings the medial malleoli together, assessing short leg side. BLOCK POSITION FOR CATEGORY 3 (RIGHT SHORT LEG) Position of Long Leg Block: The long-leg block is inserted under the ASIS, pointing obliquely 45° caudally toward the opposite acctabulum. Position of the Short Leg Block: The short-leg block is inserted obliquely under the acetabulum, pointing obliquely 45° caudally. Position of Both Blocks at Initial Stage of Category 3 Block Placement: This is the beginning position which, by reducing pelvic torsion, can begin to relieve stress upon the discs and sciatic nerve Physical therapy can be employed; however, usually, cryotherapy for 15 minutes is sufficient. The patient is cautioned against sitting long periods of time, prolonged periods of bed rest, lifting, and is advised to get up and down carefully from seated positions. Often a lumbosacral brace can be helpful, as well as home use of ice for 15 minutes every hour. The rule is that, if the painful area on the back is warmer than any other area of the body, icing is indicated, always with cloth between the ice and skin. If the patient is able, gentle walking for short distances can be helpful; but he or she should not perform any activity that increases the pain. Sleeping can be difficult but, usually, a pillow under the knees while supine or between the knees if on the side can help significantly. Generally,23 treatments are sufficient to get the patient out of the acute phase. If the condition persists, is not congruent with your SOT indicators2, or is unresponsive to treatment, further evaluation is indicated. Sometimes a referral for allopathic co-treatment will be indicated, as well as further diagnostic studies. Dr. Charles L. Blum is the President of Sacro Occipital Technique Organization-USA (SOTO-USA), PO Box 24936, Winston-Salem, NC 27114-4936. For more information call 336-760-1618, or email ([email protected]. If Pain is Relieved, Leave Patient for 15-60 Minutes If Pain is NOT Relieved by 1-2 Minutes, Begin Modifying Block Position1 Adjusting the Short Leg Block: Begin with the short-leg block, rotating block caudally in 10° increments, waiting 30 seconds to determine by the patient's response the best possible block position. II any caudal position fails to reduce pain, restore block to initial position and adjust block ccphally in increments of 10°. If no position creates any pain relief, return block to initial position. Adjusting the Long Leg Block: After the optimum position of the short-leg block is determined, repeat the above procedure with the long-leg block, first caudally then ccphalad. Usually a specific position of the short and long-leg block will be found that will create some degree of pain relief.