I ABSOLUTELY LOVE TEACHING chiropractic techniques and always have. My burning fire for teaching was first kindled while at Palmer College of Chiropractic, West Campus, where I led study groups for my classmates starting in the first quarter and later worked as a peer tutor. By graduation, I knew I wanted to be a continuing education instructor in our profession. After graduating in 1996, I recall attending my first chiropractic CE seminar and naturally chose a technique class. I was excited because I was a new doctor and hungry to see what seasoned field doctors were learning.
I thought we would do some handson work, but to my disappointment, the instructor spent the next two hours “talking” about the technique with no workshopping opportunities. It was frankly very dull, and as I looked around, I noticed others were also bored. I swore that when I started teaching, I would strive to make my classes as interesting as possible.
Now, there is always a time and a place to discuss anatomy, evaluation and examination procedures, and technique concepts. This allows for a healthy amount of hands-on learning, which keeps audiences interested. Getting people involved makes learning fun.
After all these years of teaching about adjusting the extremities and spine, the program I enjoy teaching the most centers on the feet and ankles. It’s also the most frequently requested program that state associations and chiropractic colleges ask me to speak on (ribs, shoulders, and thoracic spine come in second).
I enjoy teaching about areas of the body that we don’t traditionally receive in-depth training on in school but are clinically crucial to patient care. I discovered the importance of the feet, ankles, and arches in my first year of practice, and I have been running with it ever since. Let me give you a snippet of my lecture.
The feet are the foundation of our human “house.” Patients receive very little education about the feet to understand or appreciate their importance in posture and whole-body stability. Everyone’s feet tell a story; are you listening? I guarantee you that your patients and other healthcare practitioners are not.
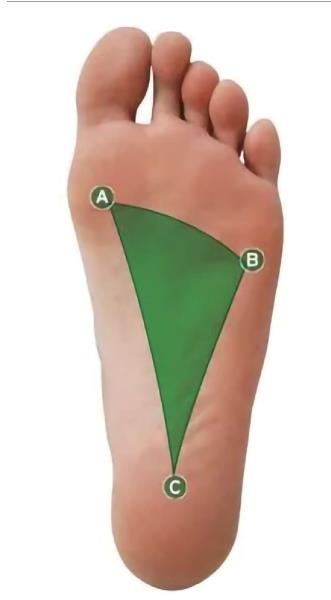
The feet have nine bones, three ligaments, and four muscles that hold up the three arches. Let’s emphasize that we have three functional arches on the bottom of the foot, not just one. Patients are quite astonished when they find out there is more than one arch. I always show them the above picture so they visualize and understand.
The medial longitudinal, lateral longitudinal, and transverse (metatarsal) arch form the plantar vault of the foot, and they begin forming at age three or four. By age six or seven, the arches are fully formed, so the arch support is set no matter how much larger the foot gets.
The plantar fascia and the bone-tobone ligaments (i.e., spring ligament) provide the primary stabilization of the foot. The intrinsic and extrinsic foot muscles provide secondary support (do not directly support the three arches).
Usually, our arches drop slightly toward the floor (pronate) when standing or walking so the foot can bear weight properly. Because of factors like genetics, gravity, shoes, sports/activities, injuries, weight, etc., foot ligaments plastically deform or stretch out over time. Thus, the foot overpronates or flattens out. Flat feet frequently happen out in practice, and through thousands of weight-bearing digital foot scans, we observe that nine out of 10 people have mild, moderate, or severely flat feet.
If the overpronated feet kept to themselves, there would be no need for the rest of this lecture. Unfortunately, that’s just the beginning for all the folks with flat feet. A healthy foot supports the body’s weight (50% on the hindfoot and 50% on the mid/forefoot). It also absorbs 30% of the 5 g of ground shock that occurs with each heel strike during the stance phase of the gait cycle.
I always want to provide you with easy ways of learning things. It would be best if you didn’t memorize facts because they are quickly forgotten. Learning with pictures helps cement concepts in your brain.
“An overpronated foot does not usually bear weight or absorb ground shock as effectively.”
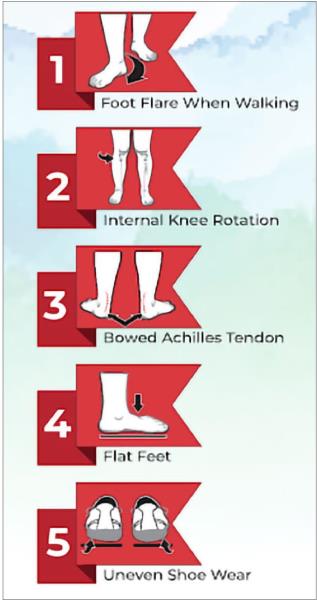
When the feet overpronate, we see five visual findings; they are famously called the “red flags of pronation” {Figure 7) and are regularly observed in our patients. Not all five are necessary or always present, but we often see them.
These are self-explanatory, with just a few notes to help you out. Standard foot flare is 12 to 18 degrees, so an overpronator flares their feet more. Lateral heel wear is typical for both shoes because of normal gait. However, uneven lateral heel wear will indicate which side the overpronation is on.
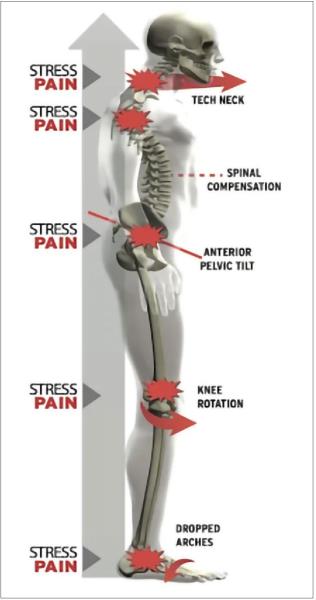
Another way of observing the changes overpronating feet can cause is to look at a lateral postural view {Figure 2). Notice that as the three arches drop and the tibia/femur bones medially rotate, the pelvis tilts anterior, the thoracic kyphosis is exaggerated, and the forward head carriage becomes more accentuated. The “tech neck” appearance is extremely common and an easily observed phenomenon.
 1. Red Flags of Pronation
 2. Lateral Postural View
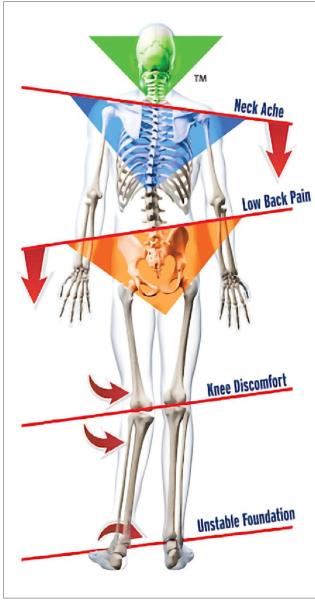
The following diagram is referred to as the “crooked person” {Figure 3) and is something common you will observe in your patients when you do a typical posture exam. This example has the left foot being flatter than the right, but it could just as well be the right foot in your practice. Remember that foot overpronation is bilateral and asymmetrical. The diagram is drawn to make it easier to understand.
 2. Crooked Person
An overpronated foot does not usually bear weight or absorb ground shock as effectively. This sets up a situation where the flat foot influences the lower kinetic chain.
The diagram above is essentially what we see on an A-P posture exam. The overpronated left foot stresses the inner ankle, which creates inward rotation of the tibia/femur and stress on the medial knee and the hip joint. The pelvis tilts toward the side of the flattened foot, causing compensatory scoliotic curvatures of the lumbar and thoracic spines. The shoulders then tilt opposite to compensate and keep the neck upright.
The overpronation phenomenon in the crooked person diagram helps us understand and identify common injuries we see in clinical practice. We can also identify subluxation patterns of the associated bones and adjust them accordingly.
I can’t wait to have you in one of my classes so I can explain and show you how to do all of this in real time. It was a pleasure to give you a taste of how I teach my classes.
I continue to be motivated to make my continuing-education courses exciting, engaging, and intriguing. I strive to make the information I teach highly relevant to clinical practice and keep the participants interested and off their portable devices. Teaching drives me to be a better-practicing clinician, and I am constantly inspired and grateful to those I am lucky enough to have in my classes.

Kevin M. Wong, DC, graduated from the University of California, Davis, and Palmer College of Chiropractic West in 1996. He has been in practice for over 26 years and owns Orinda Chiropractic & Laser Center in Orinda, California. As a Foot Levelers’ Speakers Bureau member since 2004, Dr. Wong travels the country speaking on extremity and spinal adjusting.